Setting Up Expense Types
Expense types identify categories that match your company's expenditures. Employees select an expense type when adding or editing an expense report line item (see Adding and Editing Expense Report Line Items for details).
To set up expense types that your company allows, click the Expense Types link in the left column of the Services | Expenses page.
The Expense Types page appears with a list of expense types. Next to the "Show:" label, you can click the All, Active, or Inactive tabs to show all expense types, only the active expense types, or only the inactive expense types.
Supplied Expense Types
Expense provides many of the standard expense types that a business might use. They are all set to Active.
Modifying Expense Types
To modify an expense type, select the expense type, and then click the View link in the right column of the expense type. You can then click the Edit button to show the Edit an Expense Type dialog, where you can edit the expense type settings. These settings differ depending on the expense type (shown below is the Meals expense type):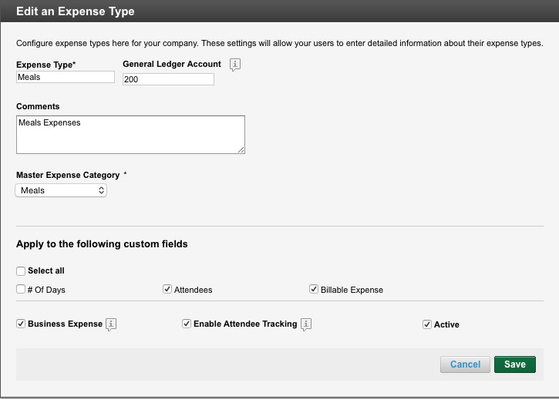
- Expense Type: Enter the name of the expense type that appears in the Type drop-down menu in an expense report.
- General Ledger Account: Enter the general ledger account number or identifier.
- Comments: Add comments about this expense type.
- Master Expense Category drop-down menu: Choose the parent, or "master" expense category.
- Apply to the following custom fields: Apply any custom fields to this expense type so that they appear in the expense report line item when this expense type is selected. For example, select Attendees to show the Attendees custom field. For details on setting up custom fields, see Setting Up Custom Fields.
- Business Expense: Click this checkbox if the expense type is a business expense.
- Enable Attendee Tracking: Click this checkbox to enable attendee tracking for this expense type, with the ability to search for attendees in company and global address books. See Setting Up Company Address Books for details.
- Active: Uncheck this checkbox if the expense type should no longer be active.
Tip: You can edit several different Mileage expense types to offer different mileage rates (such as rates for motorcycles and trucks). The Edit an Expense Type dialog shows field that let you enter the current mileage rate and effective date (to apply to expense reports not yet submitted), and the upcoming mileage rate and its effective date (if known).
Click Save to save your changes.
Creating Expense Types
You can also create more expense types. To create an expense type, click the Create Expense Type button above the list of expense types, provide the information above (in "Modifying Expense Types"), and click Save.