Creating an Expense Report
- IT Info
- Becca Cook
To create an expense report from scratch, choose My Reports from the Expense menu, or click the My Reports tab if you are already in Expense, and then click the Create New Report icon.
Tip: You can also create an expense report by selecting transactions and receipts in the Digital Wallet, and adding them to a new report. See Using the Digital Wallet for more information.
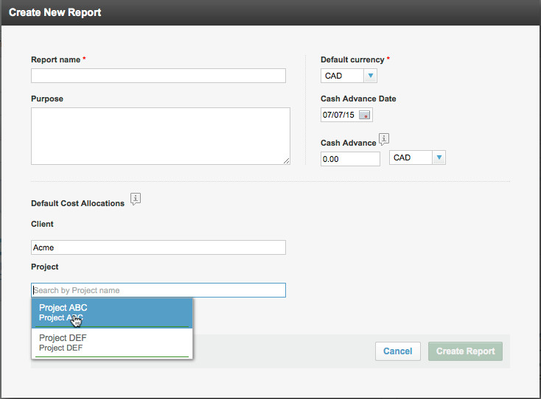
After starting a new report, the Create New Report dialog appears:
Follow these steps:
- Enter the Report name. This identifies the expense report in a list of reports.
- Enter the Purpose (optional). Your expense report approver uses this field to determine the expense purpose.
- Choose the currency format for the amounts in this expense report from the "Default currency" dropdown menu.
Tip: The system uses the currency you chose for your profile (as described in Display Settings), unless you change it here. If the currency is different than the currency used by the company, report totals appear in both currencies. - If your site allows entering a cash advance, and you received a cash advance:
- Click the calendar icon for Cash Advance Date and choose a date, or enter a date.
- Enter the advance amount in the Cash Advance field.
- (Optional) If cost allocation segments have been set up for your site (such as "Client" and "Project" in the above figure), you can choose the default cost allocations for the entire expense report by starting to type the cost allocation. Suggestions appear for easy selection.
Tip: You can later change the cost allocations for any line item in the report. If you don't choose default cost allocations, you can still choose cost allocations as you create each line item of the report, or set cost allocations for all line items at once. See Allocating Cost for an Expense Report Line Item for details. - Click the Create Report button.
The expense report screen appears with information at the top and the Transactions, Details, and History tabs at the bottom. The Details tab shows the expense report name and purpose that you entered when you created the report – you can edit this information and click Save to save it. The History tab shows the date and description for each expense report line item created, submitted, denied, adjusted, approved, and paid.
The report is empty until you add line items. See the following:
Adding and Editing Expense Report Line Items
Attaching a Receipt to an Expense Report Line Item
Removing or Changing a Line Item Receipt in an Expense Report
Itemizing an Expense Report Line Item
Adding Mileage to an Expense Report Line Item
Allocating Cost for an Expense Report Line Item
Working With Expense Reports