Viewing Transactions in the Digital Wallet
- IT Info
Viewing Transactions
Choose one of the following from the dropdown menu at the top of the Digital Wallet:
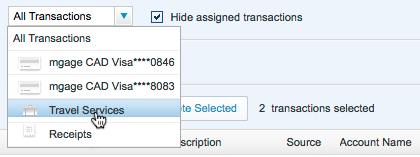
- All Transactions: Show all transactions and receipts, including receipts already merged with transactions, and fully processed receipts.
- A specific account: Show only transactions from a specific account and their associated receipts.
- Travel Services: Show all transactions (prepaid and post-paid) from the Travel service and their associated receipts.
- Receipts: Show only receipts. This includes receipts "in process" (undergoing recognition) as well as fully processed receipts, unattached receipts, and receipts already merged with transactions.
Tip: Click the checkbox for the "Hide assigned transactions" option to hide all transactions already assigned to expense reports.
You can then click a transaction to display its details:
![]()
Note: You see only the transactions that you might want to attach to an expense report – you don't have to wade through irrelevant payments you made to reduce your account balances.
Filtering the Digital Wallet List
You can filter the list of transactions and receipts in the Digital Wallet by clicking the Filter button on the right side of the list.
![]()
You can then filter the list by a date range. Click inside the From and To date fields to select dates on a calendar, and then click Search to show the results.
As an alternative, or in addition to the date fields, you can enter text in the Description field to filter the list by the description, and then click Search to show the results.
Tip: Click the Clear Filters link next to the Search button to clear the filters.
Merging and Un-Merging Transactions with Receipts
Note: If Automated Receipt Processing is enabled for your site, the system performs optical character recognition (OCR) with human verification for captured receipt images in order to recognize the date, amount, currency, expense type, and description (merchant name) on the receipt. In addition, Intelligent Matching automatically combines transactions with receipts that represent the same expenditure.
Matched transactions can be identified by icons in the source and receipt columns in the main Digital Wallet. For example, in the figures below, the "AGENT FEE" transaction and receipt are consolidated into one entry that includes both a credit card icon and a receipt icon.

![]()
You can "un-merge", splitting the transaction from the receipt. To spit a transaction from its receipt, click the transaction to open it, and then click Unmerge at the bottom of the transaction:
![]()
Adding Items to an Expense Report
To add items to an expense report, you can click the checkbox next to an item in the Digital Wallet list to select it, or click multiple items to select them, and choose the report from the Add to Report dropdown menu. The items appear as line items in the report.
Tip: You can start a new expense report with the selected items by choosing Add to New Report from the Add to Report dropdown menu. See Creating an Expense Report for details on naming and setting up the new report.
To select all the items at once before adding to the report, click the checkbox at the top of the list to the left of the Date column heading. You may want to filter the list first, to show only the items you want.
You can also drag items to the Create New Report icon in the My Reports pane on the left side of the page to create a new report, or drag items to an existing report icon to add them to an existing report. The items appear as line items in the report – see Creating an Expense Report for details on editing line items.
Refreshing an Account's Transactions
To refresh the transactions that are displayed in the Digital Wallet, click the refresh arrow in the top right corner:
![]()
The Update Account page appears. You can select the range of transactions to import: up to 30, 60, or 100 days old. Select the appropriate range and click Update. The new transactions appear in the Digital Wallet under the Transactions tab.