Adding Receipts to the Digital Wallet
- IT Info
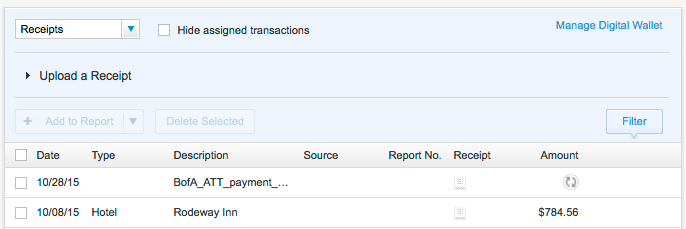
Choose Digital Wallet from the Expense drop-down menu, or click the Digital Wallet tab on the right side of the Expense screen. The Digital Wallet appears:
Viewing the List of Receipts
You can choose the following from the dropdown menu to filter the view:
- Receipts: Show only receipts. This includes receipts "in process" (undergoing recognition) as well as fully processed receipts, unattached receipts, and receipts already merged with transactions.
- All Transactions: Show all transactions and receipts, including receipts already merged with transactions, and fully processed receipts.
Note: If Automated Receipt Processing is enabled for your site, the circular arrows icon in the Amount column (shown in the above figure) indicates that the receipt is being processed for recognition.
Tip: Click the checkbox for the "Hide assigned transactions" option to hide receipts already assigned to expense reports.
Adding a Receipt to the Digital Wallet
You can upload an image or PDF version of a receipt to the Digital Wallet from your desktop computer. Follow these instructions:
- Click the Upload a Receipt link above the list of transactions to show the Upload a Receipt section, which includes the Choose File button.
- Click Choose File to select the receipt image file on your computer.
- Enter a name for the image, and click Upload.
Note: If Automated Receipt Processing is enabled for your site, the system performs optical character recognition (OCR) with human verification to recognize the date, amount, currency, expense type, and description (merchant name) on the receipt.
You can also email receipts directly to your Digital Wallet. You are assigned your own unique email address for sending receipt images. For example, if you receive an email from a hotel with a receipt attached, you can simply forward the email to your unique address. You can also provide your unique email address to an assistant or another person to send receipts for you.
To find your unique email address, click the Manage Digital Wallet link in the upper right corner of the Digital Wallet (shown in the figure above). The email address appears at the top of the Manage Digital Wallet dialog (usually an address such as "youruserid@receipts.deem.com"). The name of the image is the subject line of the email (if any), plus the filename of the image.
You can use any type of device that can send email with an attached image, including a feature phone, smartphone, computer, or even a fax scanner that can send an email. You can email attached images that use the HTML, PDF, JPEG, TIFF, GIF, or PNG image format. If you send a receipt in an unsupported format, you receive a notification by email that the receipt was not accepted.
Adding a Receipt Using the Mobile App
You can use the Mobile App to capture a picture of each receipt (using the mobile device’s camera), and automatically upload the receipt to the Digital Wallet. See Capturing Receipts with the Mobile App.
Viewing Receipts
Click the receipt icon in the Receipt column to view a receipt:

The receipt appears in a separate tab of your browser.
Removing Receipts
To remove receipts from the Digital Wallet, click the checkboxes for the receipts to select them, and click the Delete Selected button above the list of receipts. This action permanently deletes the selected images.
Adding Receipts to an Expense Report
You can start an expense report with selected receipts, or add selected receipts to an existing report. Click the checkboxes for the receipts to select them, and choose Add to New Report or an existing report from the Add to Report dropdown menu. The receipt is attached to an empty line item in the report – see Creating an Expense Report for details on editing a report.
You can also drag receipts to the Create New Report icon in the My Reports pane on the left side of the page to create a new report, or drag them to an existing report icon to add them to an existing report. One new expense report line item is created for each receipt. The line item description defaults to the receipt name, which you can edit later. See Creating an Expense Report for details on editing line items.