Personal and Business Information
To open the Profile page, click your name at the top of the screen, and choose Profile from the drop-down menu.
The top part of the Profile page shows your personal and business information, which is used to automatically populate fields when booking travel, hotel, car rental, etc. This includes sections for contact details, business and home addresses, payment cards, profile details, and delegates.
Profile Details
In the Profile Details part of the personal and business information section near the top of the Profile page, enter or edit your information as follows:
- Click Edit personal info to edit your name, date of birth, and gender. Be sure to use the name that appears on your driver’s license and/or passport, so that this name can be used to purchase flights.
- Click Edit emergency contact to enter your emergency contact.
- Click Change Password to change your password.
Click the Save button to save your changes.
Contact Details and Addresses
To add or edit contact details, the home address, or the business address, click the Add or Edit button in these sections (the Add button appears if you haven't entered information yet). The Addresses and Phone Numbers page appears. You can enter or edit the address, phone numbers, and emails for both your home and your business. You can also set confirmation emails to be sent to the appropriate email address: the profile email address, or another email address that you can enter in the "A different email address" field.
Click the Save button to save your changes.
Payment Cards
To add or edit payment cards, click the Add or Edit button next to "Payment cards" (the Add button appears if you haven't entered a card yet).
Enter one or more credit cards. Banking-level encryption and security measures are used to protect this information. For each card:
- Include the cardholder's name (as it appears on the card), the card type, and the card number and expiration date.
- Create a name for this card in the "Name this card" field. This name will appear in drop-down menus for selecting a payment card, making the card easy to select.
- Add the card's billing address.
- Set an alert to notify you of the card's expiration in the Expiration Alert section: Choose the number of months, or Never, from the Display alert drop-down menu.
- Click the Save button to save your changes.
Delegates
A delegate is someone who can book travel or submit expense reports for you. For example, if you are a manager, you might make your administrative assistant a delegate for submitting your expense reports, or a travel manager might be a delegate to book travel for a number of employees. In addition, a delegate approver is someone who can approve expense reports for an Expense approver. For example, if you are a manager about to go on vacation, you could make your administrative assistant a delegate approver to approve your team's expense reports until you get back.
To add yourself as a delegate for someone else, or to add someone else as a delegate for yourself, click the Add button next to "Delegates". The Delegate Access page appears with sections for delegates for booking and submitting, and delegates for approval.
Delegates for Booking and Submitting
You can add yourself as a delegate for booking travel or submitting expense reports for someone else. You can also add a booking and submitting delegate for yourself.
Adding Yourself as a Delegate
Follow these steps:
- Click Become a delegate in the People I Can Book and Submit For section. The Become a Delegate page appears.
- Enter a name or email address in the Search field to search for the person for whom you will be a delegate. One or more names appear.
- Click the radio button next to the person's name in the search results.
- Click the Select button. A confirmation email is automatically sent to both yourself (confirming that you are now a delegate) and to the person for whom you will be a delegate.
Adding a Delegate for Yourself
Follow these steps:
- Click Add a delegate in the People Who Can Book and Submit For Me section. The Add a Delegate page appears.
- Enter a name or email address in the Search field to search for the person who will act as your delegate. One or more names appear.
- Click the radio button next to the person's name in the search results.
- Click the Select button. A confirmation email is automatically sent to both yourself (confirming your delegate) and to the person you have set as a delegate.
Delegates for Expense Report Approval
An Expense approver can set up one or more delegate approvers who can approve expense reports on the approver's behalf. The approver can continue to receive email notifications for submitted expense reports in order to track approval and approve the report if necessary. A delegate approver can view the expense reports to approve under the Staff Reports tab. In addition, a payer can view the history of an expense report and see that a delegate approver approved on behalf of the regular approver. The payer can follow up with the appropriate person, if necessary.
To add a delegate approver, follow these steps:
- Click Add a delegate in the People Who Can Approve For Me section. The Add a Delegate Approver page appears.
- Enter the name or email address of the user you want to be the delegate, and click Search. A list of users appears under Search Results.
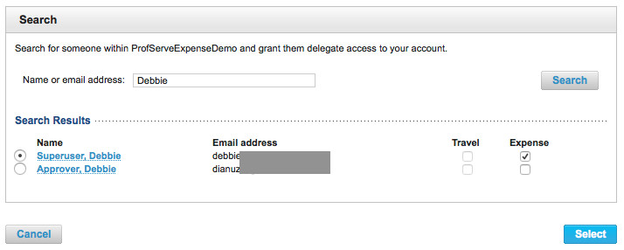
- Click the radio button for a user, and click the checkbox in the Expense column for that user. You can select only one user at a time to add as a delegate.
- Click the Select button to save your delegate selection.
Removing a Delegate
If you want to remove a delegate from your account, click the Edit button next to "Delegates". You can then click Delete to remove the delegate from your account.